Have you made a 3D Paper Craft Lately?
Are you ready to create something special?
3D Teapot with a Tea Party in Mind
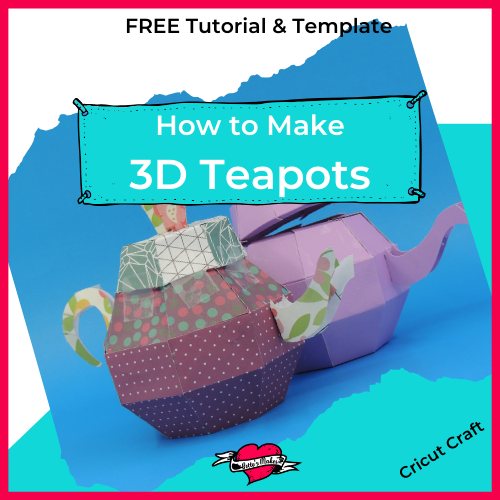
3D teapots look amazing and they are even more fun when you get to chose your own paper to make them. When I was growing up, we had fancy china plates with matching teapot and teacups. I loved the designs, but alas, the teapot was broken and tossed away. To get that same feel you had as a child in your grandmother's home, you can make this 3D teapot in plain colors, or a paper design that fits in with your DIY Home Decor.
I made a couple of these 3D teapots to put on my china shelf and they look fantastic. I also found that they are a perfect teapot for kids play tea parties!
Here’s what you need to make your 3D Teapot. This post does contain some affiliate links for your convenience (which means if you make a purchase after clicking a link I will earn a small commission but it won’t cost you a penny more)! Read my full disclosure policy.
Quick Links to Information in this Post
3 D Teapot Materials
3 D Teapot Step-by-Step Guide
Step One - Download the Template
This template has several pieces. You want to make sure you download them all before you begin.
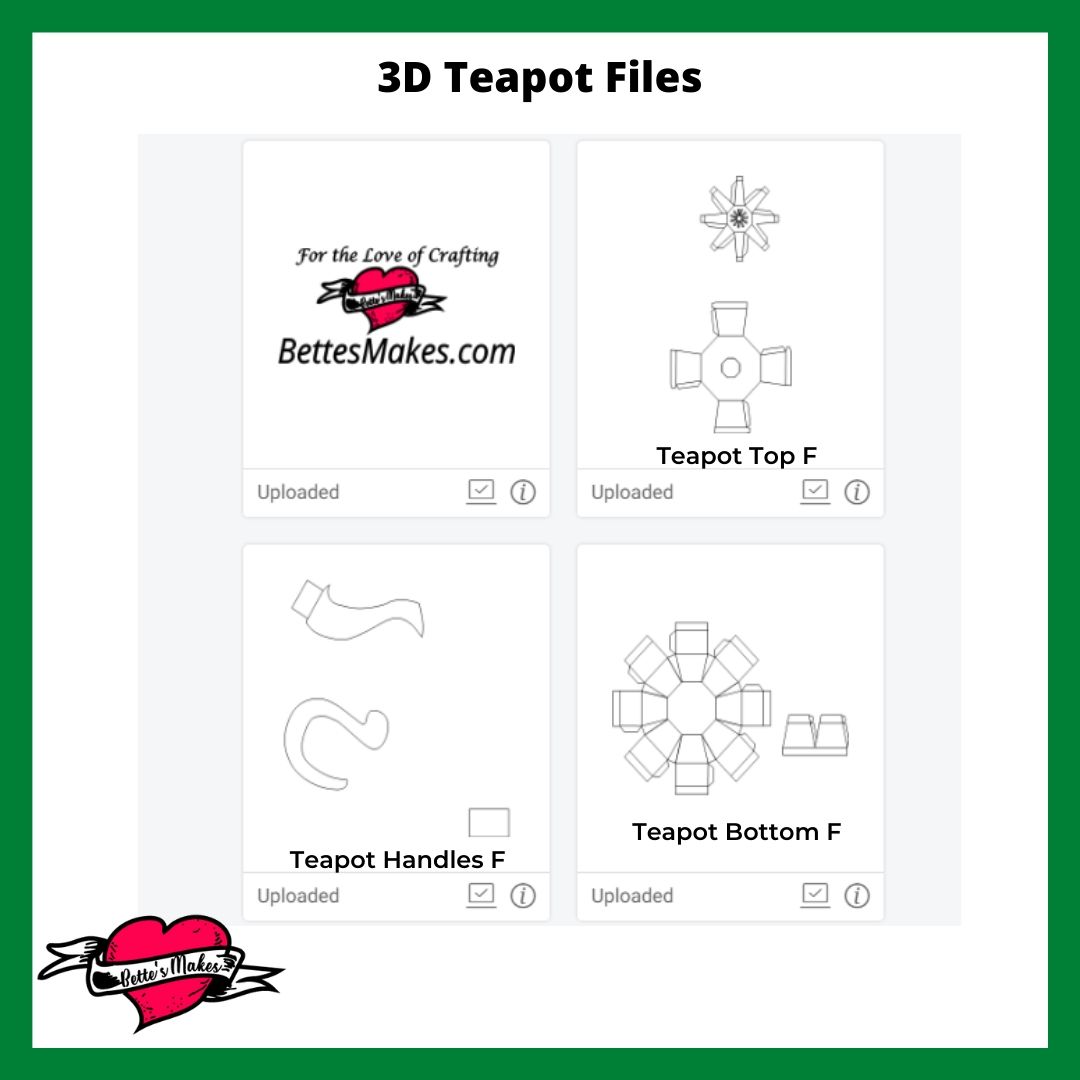
The files you should have are:
1. Teapot Bottom F
2. Teapot Handles F
3. Teapot Top F
You will need to add all of these files to Design Space using the Upload function in the Objects toolbar.
Step Three - Creating Score Lines
There are several places where you want o have Score lines. Primarily on the Top, Midsection, and Bottom pieces.
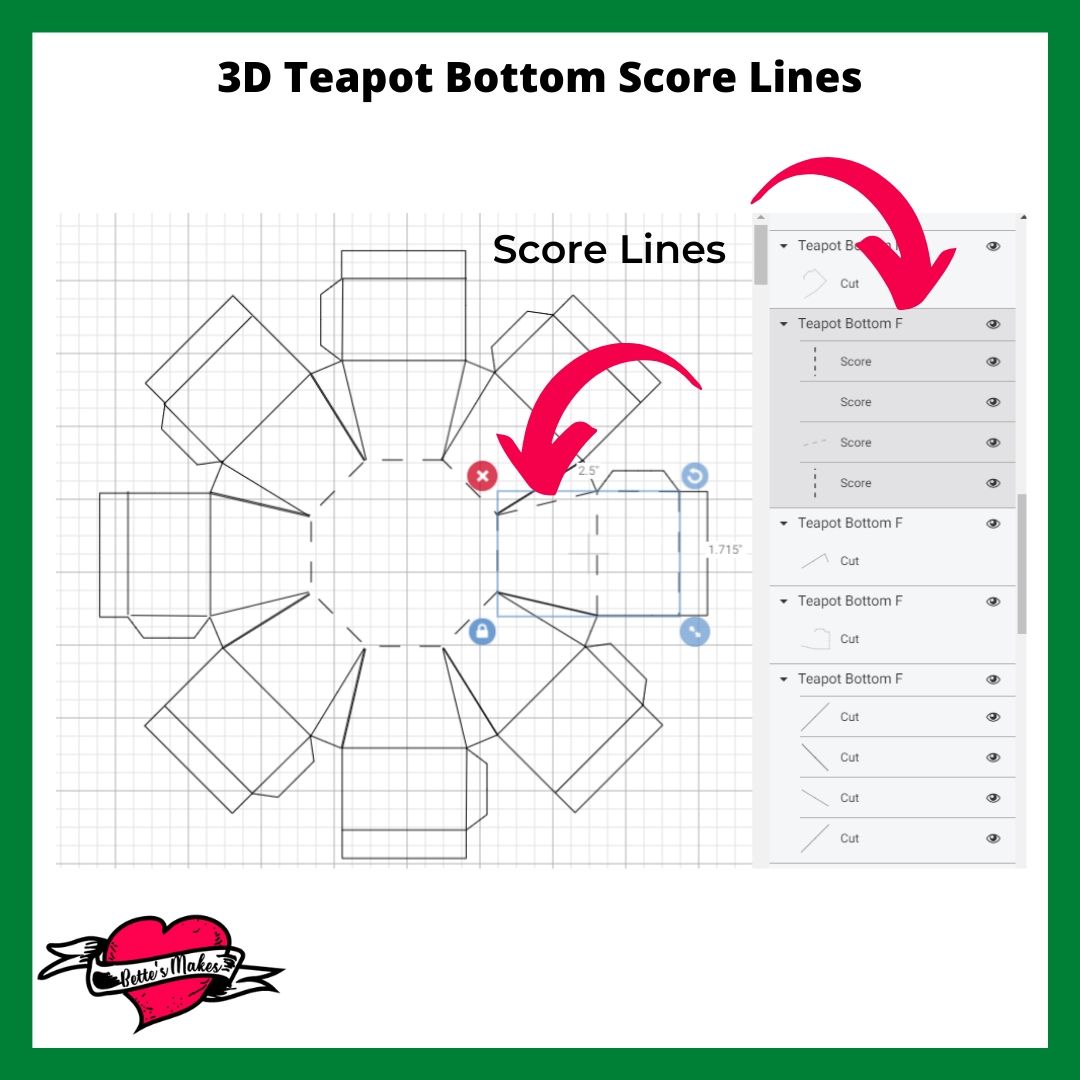
3D TEAPOT BOTTOM
We will start with Ungrouping the object. This way you will have the bottom and midsection now separated.
Start by clicking on the center hexagon. Change the lines to Score lines.
Select one wing of the bottom and click on the center line. You will notice in the layers panel that 4 lines are selected. These lines are the ones that need to be changed to Score lines. If you run into issues, remember which lines you want to make score lines and use the Layers Panel to choose the lines and change them.
Repeat this process for all 8 wings.
When you have finished making all the changes, select over the entire bottom, Group it, then Attach it.
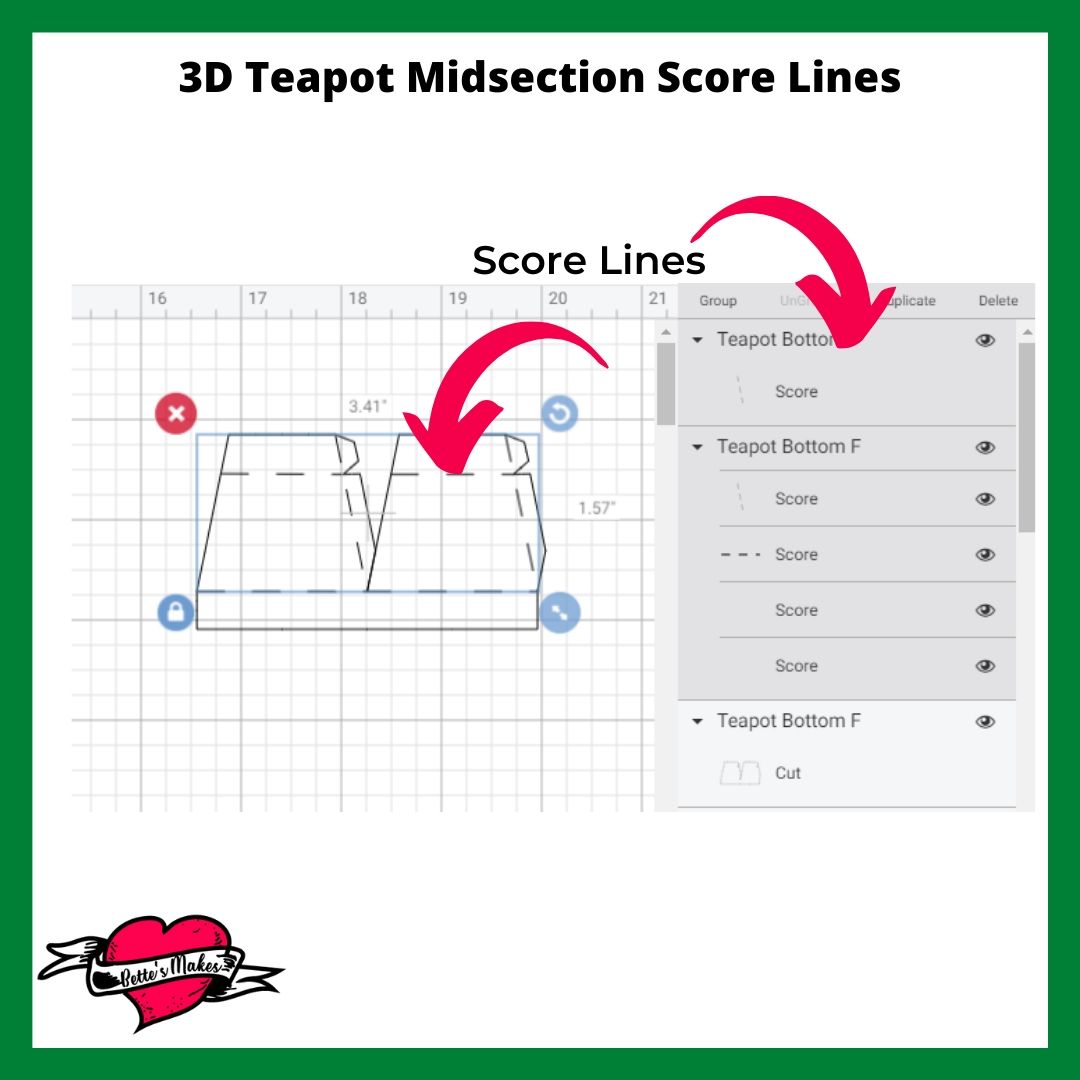
3D TEAPOT MIDSECTION
Select over the entire midsection. Look at the Layers Panel.
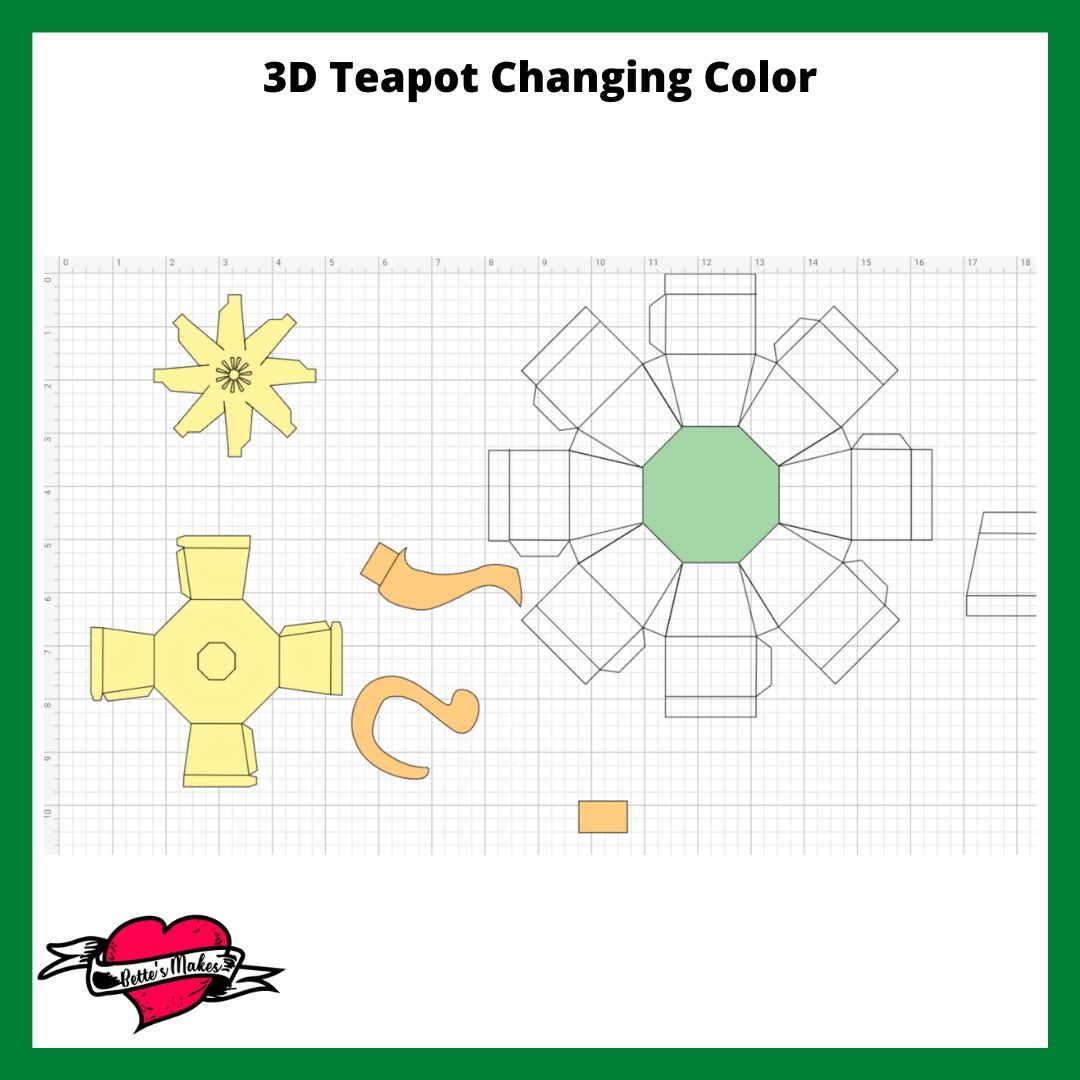
You will find that there are 6 items selected. Select only the top 5 items and not the last one which is the shape of the entire cut out. See the diagram for details.
Change those 5 lines to Score lines.
Once you made the changes, select over the entire midsection then click on Group, then Attach.
Once it is attached, Duplicate it 3 times.
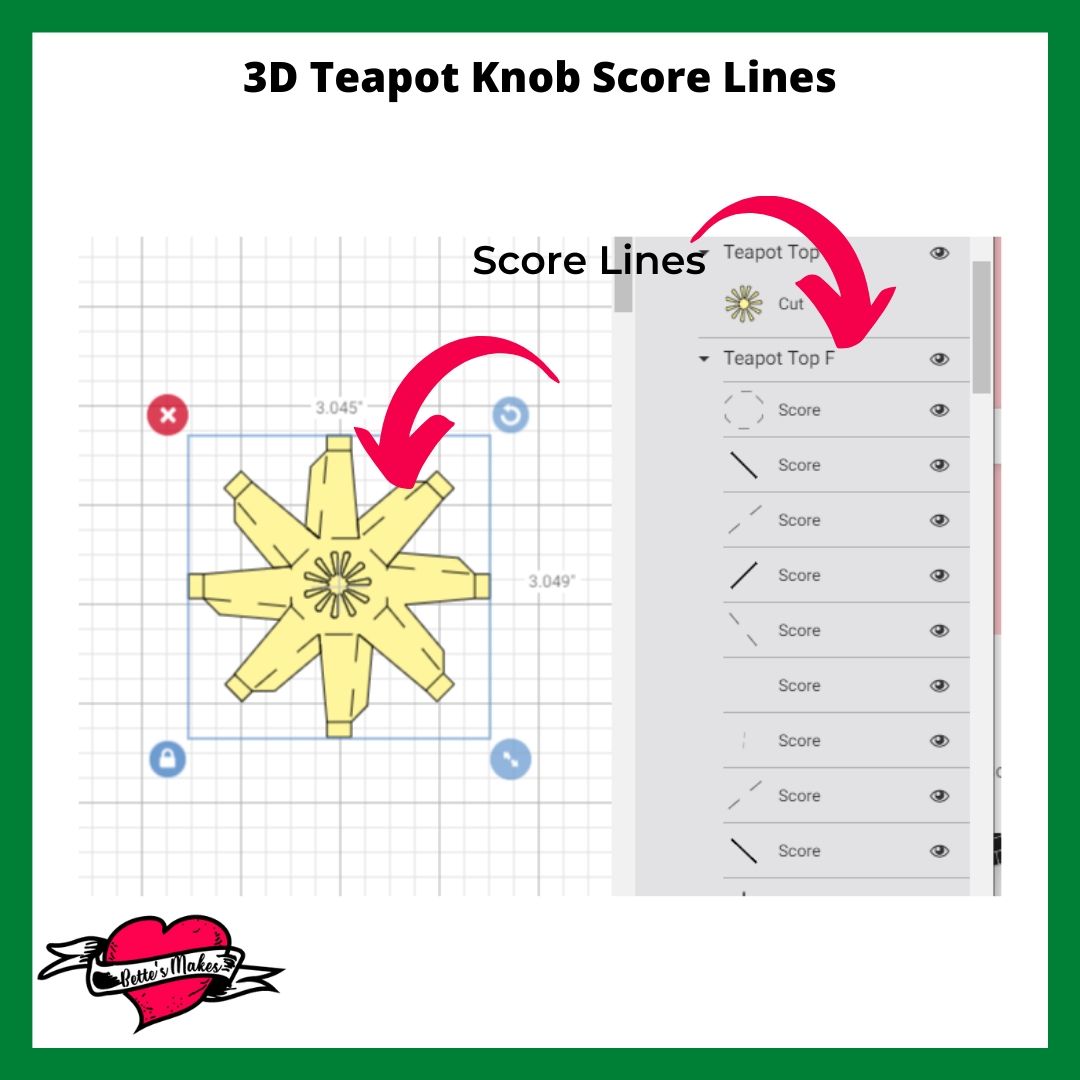
3D TEAPOT KNOB
Ungroup everything as you will need to make a few adjustments.
We will start by Arranging the knob by moving the layer that is visible to the back.
This will expose the other lines and here is where we will be changing them to Score lines.
In the Layers Panel, you will see all the pieces of the knob. We will be selecting everything except the center cutout (floral looking object) and the outside cut.
When you have these objects selected, change them to Score lines.
Remember to select over everything again to Group it, then Attach it.
3D TEAPOT LID
Ungroup everything as you will need to make a few adjustments.
We are going to do something a little different here for selecting the lines that need to be changed. This actually a short cut when you have too many little lines to select.
Select over the entire lid and change all the lines to Score lines.
Look in the Layers Panel, then select the two Score lines as follows:
Select the inner hexagon and the outside line. Change these to Cut lines. You will want to do these one at a time.
Design Space will automatically change the color to Black. Just change it to another lighter color so you can see all the remaining lines.
Select over everything, Group it, then Attach it.
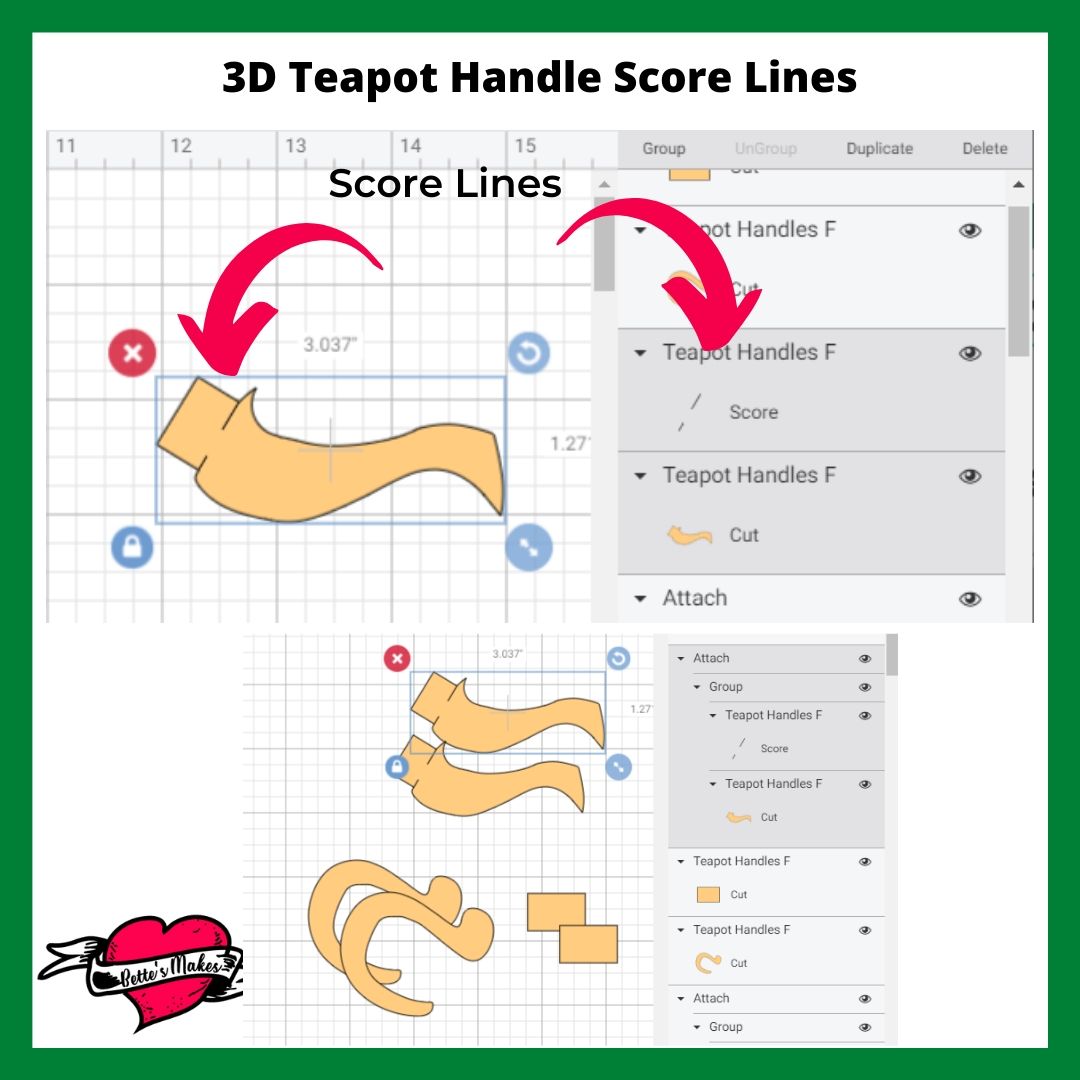
3D TEAPOT HANDLE & SPOUT
Ungroup everything as you will need to make a few adjustments.
The only Score line here is in the Spout.
The line across the end of the spout will need to be changed to a Score line.
After you make the change Group then Attach the Score line to the Spout.
You will need 2 spouts. Duplicate the spout.
You will also need 2 handles and 2 spacers.
See the diagram for details.
FINAL DESIGN SPACE ADJUSTMENTS
You may want to change the color of your parts to match - I cut out one of my teapots all in the same color and it worked out great. If you want different color pieces, you can always adjust the layout on the mats.
I used a medium cardstock for my teapot as it was sturdier than the light cardstock one I made. It will all depend on what materials you have available.
I know it seemed like a lot of adjustments but now you are ready to Save then Make It.
Step Four - Assembly
We will work our way through the assembly by going in a specific order. This way, you will be assured your teapot will come together fairly easily.
Let's start with the bottom piece.
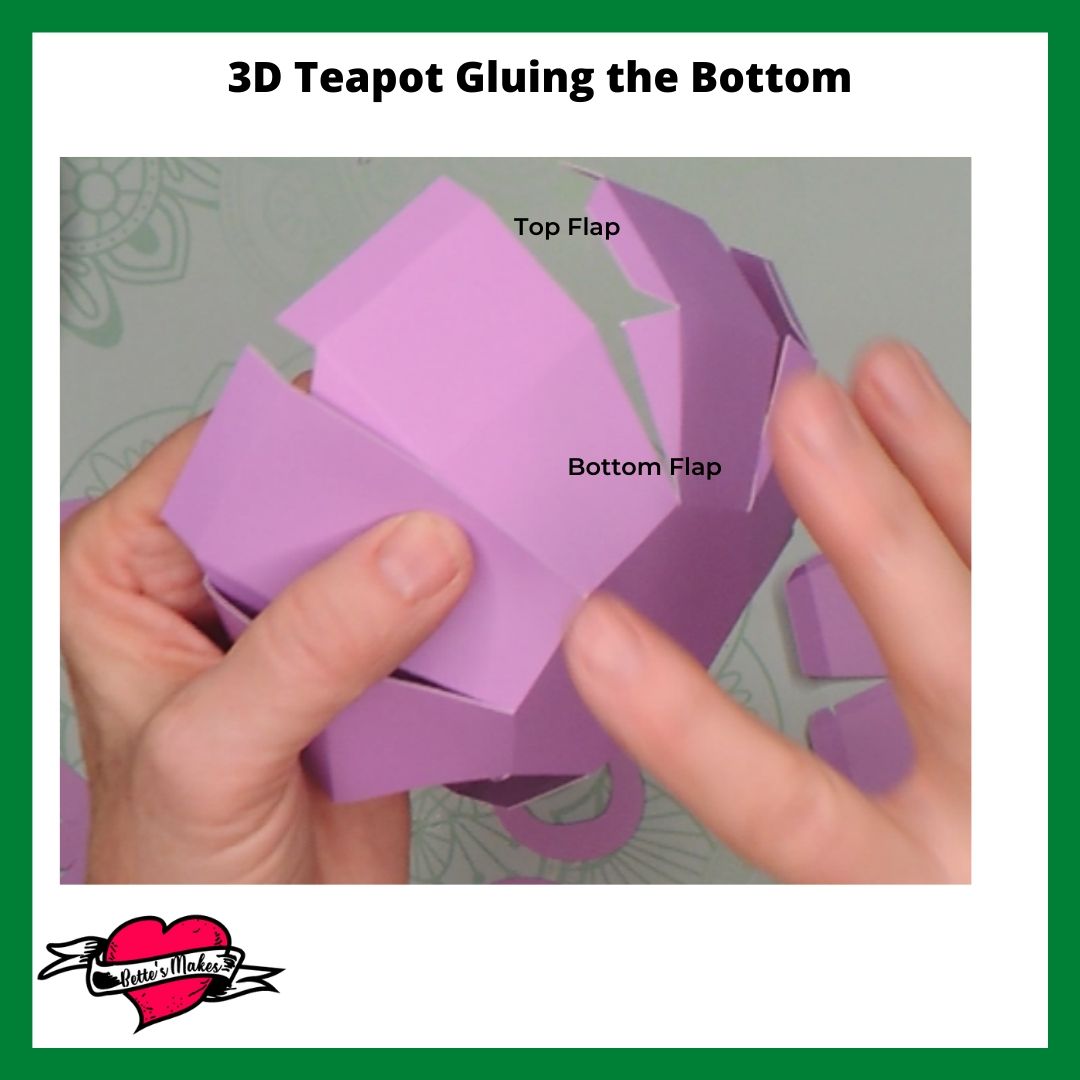
Fold every score line to the inside. This includes the hexagon shape at the base of the teapot.
Make sure all the flaps on the wings are folded inwards as these are the first pieces we will be gluing.
Glue the bottom flaps to the wing next to it. Do this for all 8 wings.
Now glue the upper flaps in place in the same manner you did for the bottom flaps.
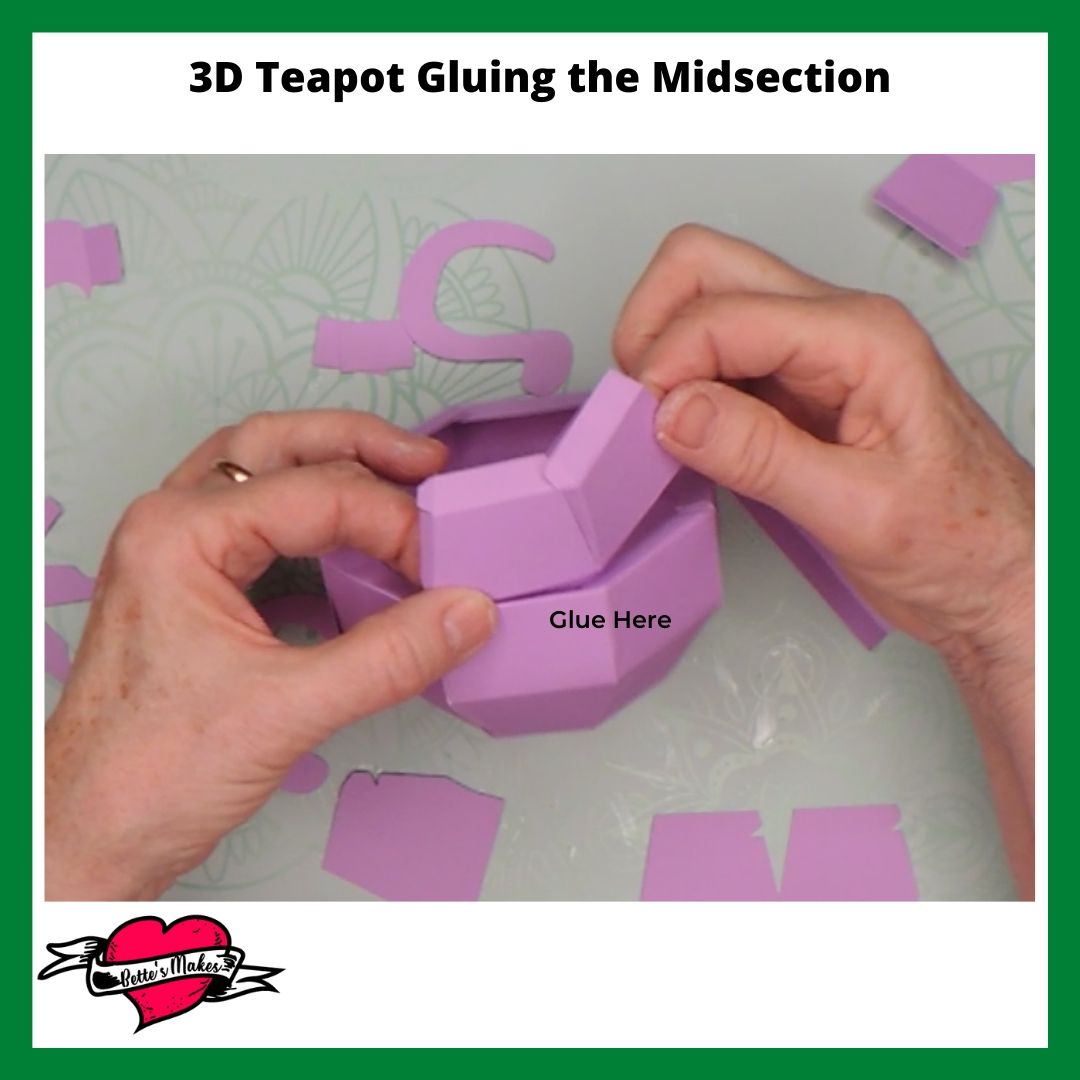
Next we will glue the midsection.
Fold down the flaps at the very top of the bottom piece so they are folded inwards.
Take one of the midsection pieces and fold all the score lines to the inside. Repeat for the other 3 midsection pieces.
Apply glue to the bottom flap of the midsection piece and adhere it to the bottom piece as shown in the diagram.
You will want to repeat this for all 4 midsection pieces making sure the side flaps are all going in the same direction.
After you have glued all the midsection pieces to the bottom, you will glue the midsection pieces together using the side flaps.
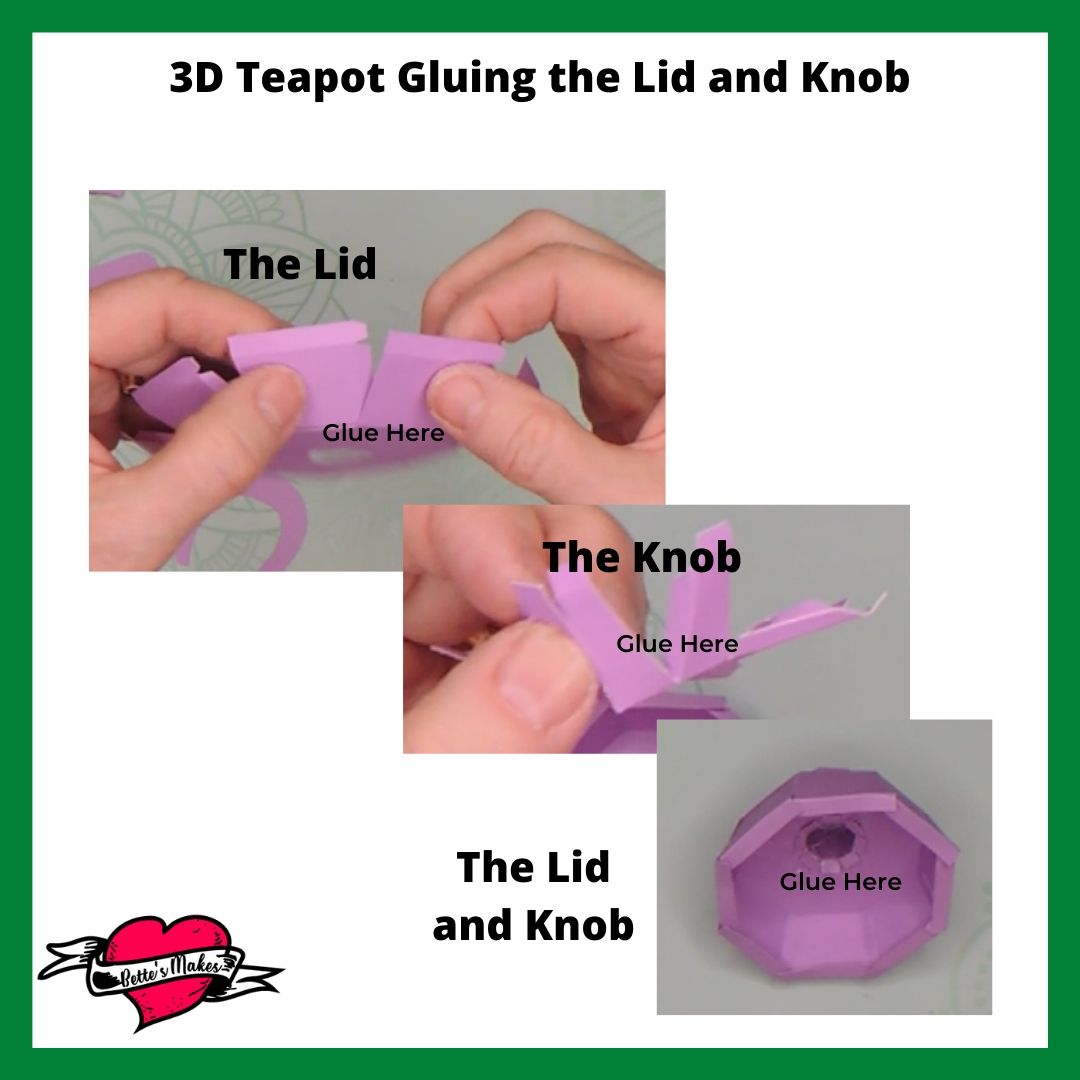
Next we will glue the Lid and Knob.
For the Lid, fold all the score lines inward.
Glue the side flaps in place to form the basis of the lid. We will need to add the knob to the top.
The knob is fairly small and more difficult to work with but if you follow the steps, it will be pretty straightforward.
Fold all the score lines to the inside, except for the very bottom, those will be folded to the outside.
Glue the flaps to the adjacent wing of the knob. Do this for each of the 8 wings.
Gluing the Knob to the Lid.
Fold all the bottom knob flaps back inside so you can insert the knob into the top of the lid.
Insert the knob and then bend the bottom flaps to the outside and glue them in place.
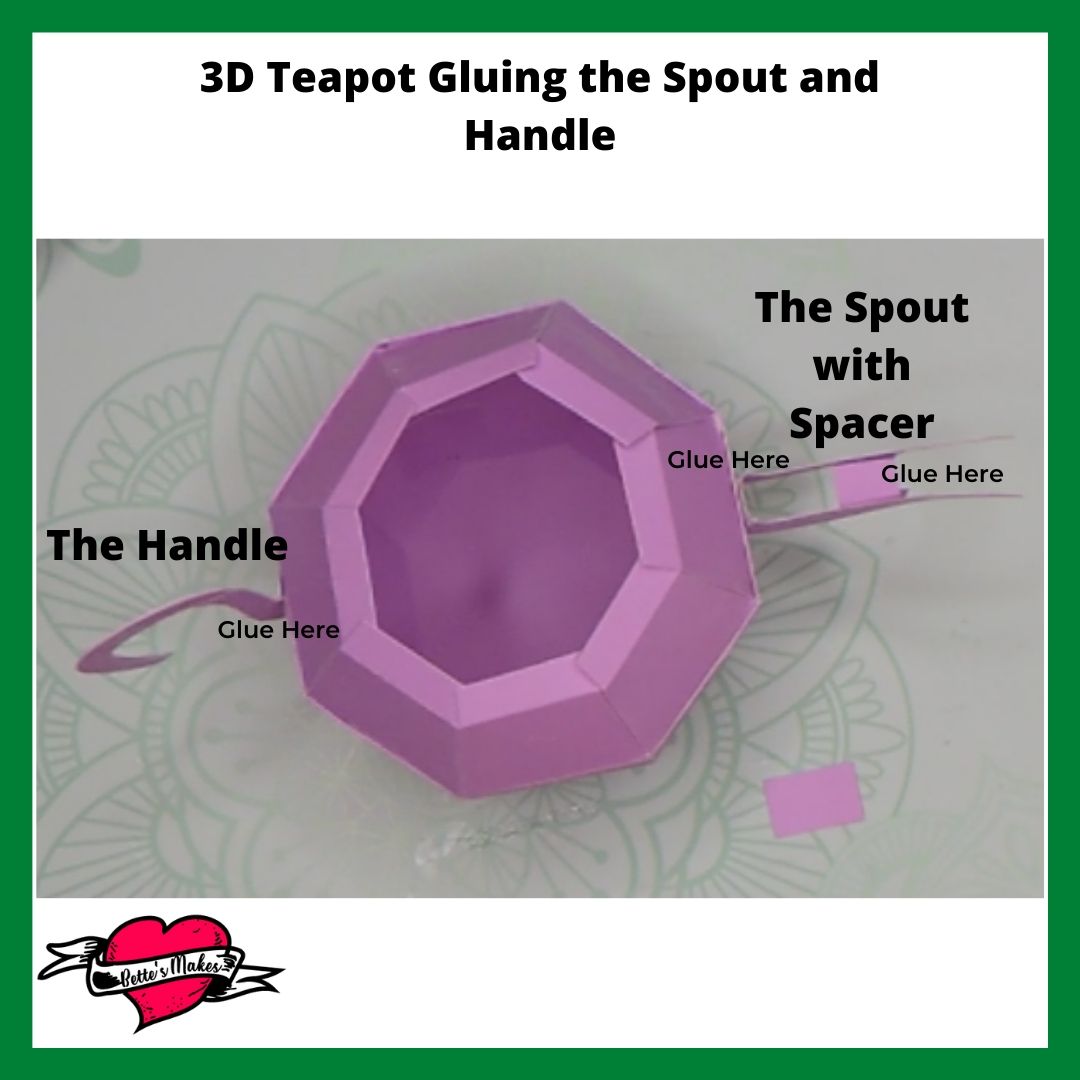
Now to add the Spout and Handle
For the Spout, fold all the score lines outward.
Take one of the spacer pieces and fold each side in about 1/4". Turn the flat portion towards you and glue the spacer to the spout pieces (see the diagram).
For the handle, fold out two small flaps (not marked in the design) so you can glue the handle in place after you have glued the handle pieces together.
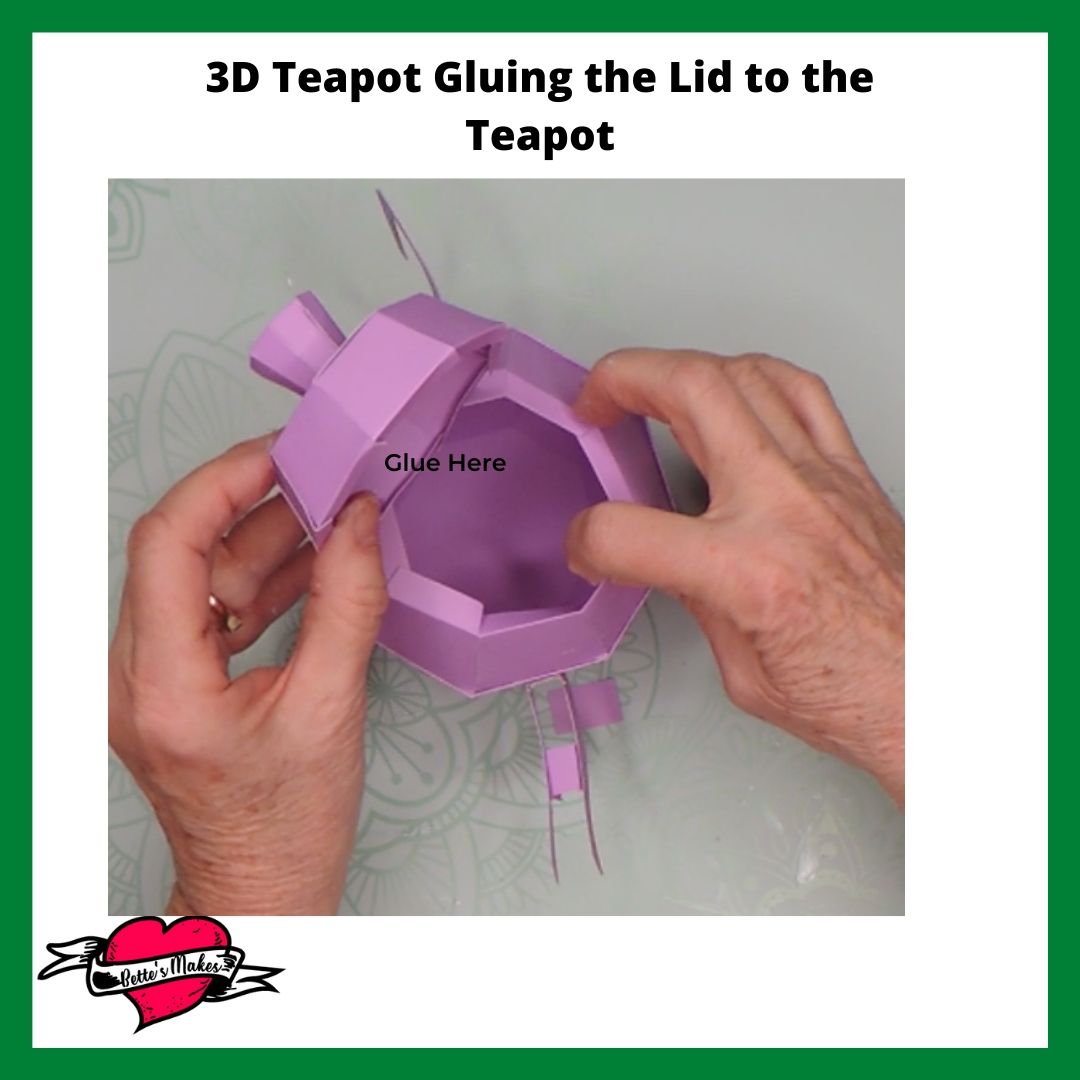
Now to add the lid to the Teapot
This will take a little dexterity to get the lid properly attached to the rest of the teapot.
This is why I left my lid open, so I could then use it as a treat box! and also not get my hands all stuck in place.
The top flaps of the midsection and the bottom flaps of the lid will now be glued together. I only glued two wings in place, but you could glue them all the way around.
And you are DONE!
More Craft Ideas from BettesMakes
Here are some amazing crafts you can make from BettesMakes.com
This is just a sampling of the dozens of crafts you can find on my website.
How to Make a 3 D Teapot Video
Last Word
Who would have imagined that you could make a 3D teapot and find so many uses for it. If you are making them for a kids tea party, you can also add some treats inside the teapot!
For DIY Home Decor, I love to add some color to my shelves with this teapot by coating it with Mod Podge so it will last much longer. The Mod Podge dries clear and does not leave that "coated fuzzy" look.
Try using a scrapbooking thin paper with this project and use the 3D teapot as a gift bag. Or perhaps it can be used as part of a dinner table setting with some goodies inside.
I hope you enjoyed this project as much as I did.
If you made a card, please share it on our Facebook group. https://Facebook.com/groups/BettesMakes
Until next time,
Happy Crafting!


Please join me on Pinterest: https://Pinterest.ca/BetteMakerCreations
Join my Facebook group: https://facebook.com/BettesMakes
Follow me on Instagram: https://Instagram.com/BettesMakes
Subscribe to my YouTube Channel: https://www.youtube.com/c/BettesMakes
